What is UX?
User experience (UX) design is a process that creates intuitive and functional products for its users.
It is focused on understanding and improving interaction that users achieve with specific tools, products, or services. The main goal of a UX designer is to create enjoyable and intuitive experiences for the users. UX follows an iterative process, and the final output is UI – User Interface. User Interface is not only screens, but also a physical object, process, or service.
From a scientific standpoint, UX design:
- Observes what’s going on
- Questions why things are happening the way they are
- Experiments to test hypotheses
- Measures the results
- Decides whether you were right
Why do we need UX strategy in our internal processes
The UX strategy helps us identify the users’ needs and interests, but it also helps us focus on the business side and how to keep it profitable. The end-user is essential, as is the client and his business.
This is the best statement that you can tell your client or a superior who doesn’t have an idea of what UX is and whether they should pay for it or not.
For us at Q, there was a significant interest in learning more about UX strategies. We were sure it would better our design processes and help us design higher quality products.
Let’s be real, the web is full of dierent approaches and strategies, and the best way to establish your own is through teamwork and practice. Every designer in our team has her or his way of designing, built upon their previous work experiences.
That’s why we wanted to work on the process together as a team – to come up with a strategy that works for our clients and us, but follows a certain tested standard.
Our focus points were:
- User research
- Creating prototypes based on research
- Testing of the prototypes
- Iterations.
We also saw the importance of understanding the processes between various departments. So, developers and business analysts joined in. This was very helpful.
Why the UX strategy should be mandatory for every project
Each step of the strategy helps us to argue why we designed something the way we did. It does not come from our subjective opinion, but from detailed research and the conclusions we got from it.
The most important lessons we all have to adopt and the UX helps us to understand them are:
A) “YOU ARE NOT THE USER” and
B) “Don’t make assumptions about user behavior.”
You might use the product yourself, but that doesn’t mean that you represent all users. User research enables us to develop empathy for users and understanding of their struggles.
You can’t guess background motives for users’ choices and how they will behave in certain situations. You need to observe your users to recognize their behavior, options, and preferences.
If you focus on just these two lessons, you will already make better solutions.
5 steps of the UX process
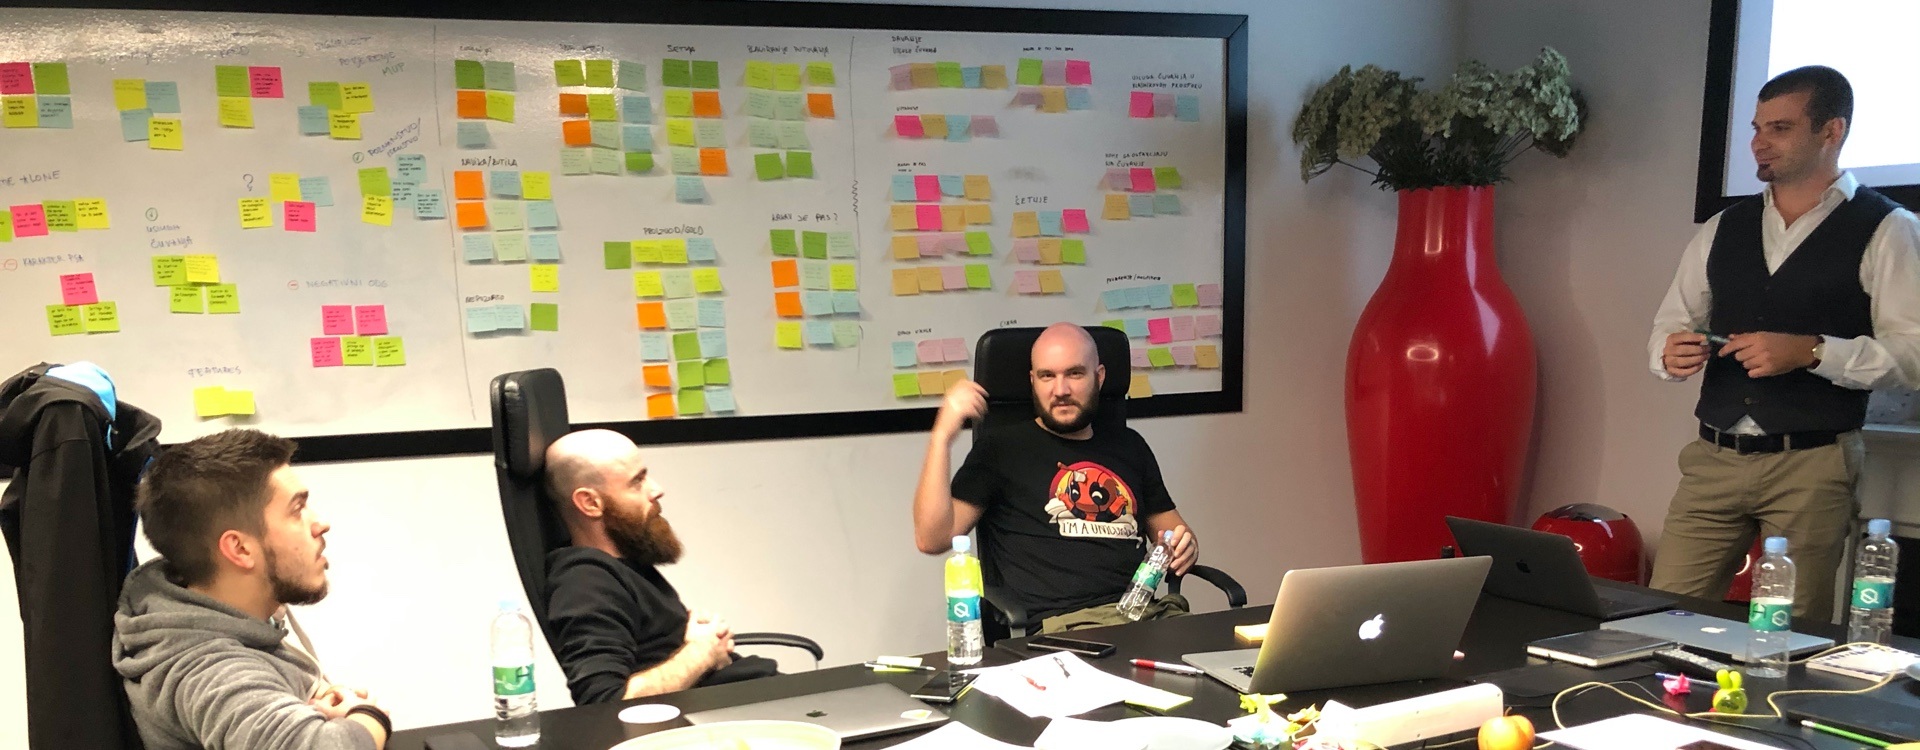
Krispin Stock (yes, that is his real name) was our UX spiritual leader, he guided us through all the crucial steps, and gave us a dierent view to what the UX really is. We already knew a lot, but he taught us how to tie loose ends. In this workshop, we went through 5 phases of the UX process.
The 5 phases of UX process are:
1. Research & Discovery
Identifying user needs through user interviews and competitive analysis.
2. Synthesizing Research & Design Strategy
Analyzing the results of the research and looking for the patterns in acquired data to better understand your users’ needs, goals, and pain points.
3. Placement & Layout Design
Creating wireframes — This is a well-known phase we all have experienced — useful for confirming your research results.
4. Execution
Breaking down the design concept into more specific elements through which you can support user goals.
5. Usability Testing
Collecting some new testing skills to evaluate your design and observe the utility & usability of the prototype.
STEP 1 – Research & Discovery
Start with collecting data.
Every project starts with collecting all the data you can get to know more about the product or service you are working on. We all do it in various ways, but the most useful approach for us is:
Competitive Analysis
It helps us find inspiration in competitor products. It also helps us find the mistakes and shortcomings of our competitors that show us potential market opportunities.
- Pros & Cons is the simplest method. It represents a list of benefits competitors are oering to your potential customers. The Pros & Cons list helps you dierentiate your product.
- Task Analysis is a fancy word for identifying the user flow (steps) throughout the competitor’s product or service and establishing potential mistakes. It is basically learning from other’s mistakes.
- Featured Inventory represents a table visualization of all features competitors use. It’s handy for quick feature comparison. We found that the list of features is the most helpful one.
When competitive analysis is done, the next phase is:
User research
User research can be conducted in various ways, but the most helpful and eicient one is “The interviews.”
Honestly, interviews are tough. They are time-consuming, expensive, and probably the hardest to arrange, but they are sooo useful. You can also use polls, they are suitable for collecting data about users, but you can’t understand motives and reasons for particular behavior based on surveys only.
So really the best, most thorough way are the interviews.
For conducting interviews, you need to be prepared – preparation is the key to success. First of all, you need at least 5 interviewers, and they need to be as close as possible to your target audience. Set:

- The goal for the interview
- What do you want to learn
- What areas you want to explore
But, you also need to be able to let the interviewer speak fluently and freely. The trick is to ask right, open-ended questions that don’t give users the ability to answer with just “Yes” or “No.”
Right questions start with:
Who? / What? / Where? / Why? / When? / How?
In this way, you can dig deep into the user’s problems and needs.
Few more tips & tricks
Introduce yourself and make them feel comfortable. If possible, record the interview. Avoid asking users what they want, pay attention to body language, tone, and facial expressions. Write down things that you notice during the interview. Interview with the help of a colleague: One should do the interview, the other should take notes.
After the interview, write down any insights that you gained. Notice if there is a pattern in data that you collected that points into some new design directions. Conclude the shortcomings in your knowledge that need to be solved with further research.

STEP 2 – Synthesising Research & Design Strategy
Synthesis of the Research is a somewhat subjective process in which you try to find a meaning to your data.
You need to collect all the insights and observations and group them into meaningful and helpful patterns.
The primary method used for Synthesis is Ainity Mapping.
We do it in 3 simple steps:
- Write on post-it notes every single insight/observation from your interviews and research
- Paste post-it notes on a wall and group similar insights
- Refine groups and give them relevant names
When you are happy with the ainity map and confident that this is the most sincere collection of quotes, observations, and insights from your research, you will get the result, which is a user persona.
User persona
A user persona is a UX design tool that impersonates problems that we are trying to solve with our design. It describes the type of person that we are designing for. It is based on real people that we have interviewed, but using imaginative details (sex, age, name…).
It is a person’s model that helps the team be on the same page when discussing design and making decisions. Give it a name and a “place to live in the project.” Print it out and stick it on the whiteboard. It will be easier to incorporate him or her into your process.
A well-done Persona includes a name, photo, quote, demographic data, problems/frustrations, goals/needs, and scenarios/behaviors.
It was a bit funny and strange for us to create one persona that includes the insights of 5 real persons. The opinions can be contradictory, and the goals can clash, but the lesson we have learned here is to prioritize. It is crucial — because if you try to design everything at once, you will have to make too many compromises. In the end, you can make 2 or even 3 personas if you want, but it will make it harder later on.

Now that the persona has been created, the next step is to think about the problem we are designing for and the solution that our design will propose. This process is called:
Problem-solving & solution
It’s done with the help of writing down the problem statements and hypotheses. You can help yourself with a problem statement format:
Persona name needs a way to user’s needs, because insight.
Eg. John needs a way to learn how to cook healthy because he is gaining weight.
The trick to writing a good hypothesis is to follow the problem statement with the question format “How might we?”
Eg. How might we help John to learn how to cook healthy so that he can lose weight?
While writing the hypothesis, help yourself with answering the HMW questions, and using the Hypothesis format:
We believe that by doing this/building this feature/creating this experience for these people/personas, we will achieve this outcome. We will know this to be true when we see this feedback/quantitative measure/qualitative insight.
Eg. We believe that by creating an online cooking class for a healthy and balanced life, we will achieve Johns goal of losing weight. We will know this to be true when we see the quantitative measure of profile weight insights.
Writing down all of these statements enables you to create a lot of ideas that address the problem. It allows you to research dierent approaches and not to restrict your research too early. It enables every member of the team to participate and own the solution. So it is crucial here to write down as many hypotheses as you want. It is a good brain workout that pressures you to deliver a lot of ideas on paper, without overthinking. Try it 😉
Now that you have your ideas and possible solutions written down on paper, you need to go further and put them inside real scenarios. The client or a project owner will understand your ideas more clearly if you communicate them visually. We reached for the more artsy colleagues and tried out our drawing skills with the help of Storyboards.

Storyboards
A Storyboard is a sketch that shows an overview of the interaction between a user and a product. It is a comic-style drawing representing a few scenarios based on your hypothesis and proposed solutions. It is a great intro and a helpful reminder for starting to realize and test your ideas with User flow.
User flow
User flow is a detailed depiction of a Storyboard, it shows the path that users will travel from the start of their interaction until they reach their goal. Where will the user click? To which page will it take him?

User Flow keeps you focused on tasks and Interactions, it enables you to research dierent approaches and not to restrict your research too early.
When you are satisfied with your user flow, or more realistically, when the flow doesn’t have flaws 😉 the next step will be writing down all the features. You will need to finalize your product.
Working with developers and BAs on the feature prioritization list is essential. You will need to prioritize the list together and try to figure out which features are vital for your product to work, and which are just nice to have.

They also need to be arranged to satisfy your client’s budget with high and low-cost presumptions. Do it with the help of a 2×2 Feature Matrix that will help you figure out the MVP and the next phases.

STEP 3 – Placement & Layout Design
After we have met our users, figured out their needs and problems, settled all technical details, we have our MVP scope, and a product that is dissected into a few parts… Now we will embark on a new level of our UX journey: Placement & Layout Design.
Placement & Layout Design
It starts with giving our project some “bones,” sketching out “Screen Flows,” which is nothing but a fancy word for Lo-Fi wireframes.
Screen Flow
Screen Flow is similar to User Flow, but here, each step represents through an image that shows what is going on in this screen.
The trick here is to sketch with a thick flat pen that leaves us as little room as possible for details. You need to be quick and rough, and draw as many of the screens as possible.
Use them to test your sketches as a paper prototype, using your colleagues, moms, and boyfriends. It’s a child’s play that will help you a lot.
Paper prototypes and screen flows enable fast iterations – in contrast to code, they can be rapidly changed and iterated, they save money and allow you to test early.
I know you like digital and medium to high fidelity prototypes. They give us a feeling of being quicker and having our wireframes set. But actually, people are more productive with paper prototypes. They move away from screens that rarely happen, and they don’t need to worry about font size or the line thickness or all the other things I know designers go into before they have all the screens set up.
There will be time for high fidelity wireframes later on, and this method will make it easier to produce them. Try it!
Information Architecture
Information Architecture (IA) deals with the structural organization of information, content, and features. It enables the user to smoothly navigate through them. It is a skeleton of the app or a website.
Firstly, we focus on the sitemap, which enables us to organize and structure a website. A Sitemap helps you recognize where content fits and what needs to be created additionally.
We most often define them in workshops with clients, with the premise that we have already done the discovery phase. They are a great way of looking at the bigger picture, and they are an excellent cheat sheet for the developers.
When the sitemap fits all the criteria, go more in-depth, and design a User journey that follows the sitemap—color code all the clicks and steps, and connect them with arrows. Strategize how you want the user to use the product (app, website, etc.) and lead him on with CTA buttons, suggested content, and try to avoid dead ends like leaving our website through external links.

STEP 4 – Execution
Wireframes!!! Finally!
I know. There was a lot to go through to come to the part that was usually the first we start with, or the client wants us to begin with. Yeah, but that’s why you are reading this article, so I hope you are still with me.
Wireframes are classified by the degree of fidelity, that is, the degree of accuracy and precision. That means there are LO-Fi and Hi-FI wireframes.
LO-FI wireframes are usually hand-drawn. They contain lines and empty spaces to communicate content hierarchy. They typically show the image as a frame and text as doodled lines.
HI-FI wireframes are usually drawn in software like Sketch, Figma, etc. They contain grayscale shading, dierent typography & styles to communicate content hierarchy. They include spaces reserved for images and text descriptions that will be used in-app or website Mockups.
In this phase, we usually go with the Hi-FI wireframes, but it depends on the project and the designer working on it. Focus on the main steps of User Flow and pay attention to visual hierarchy and relations between elements (typography, buttons, and spaces).
Wireframes naturally lead you to the design phase, and this is the phase that leaves it up to the designer to determine her or his workflow. It also depends on the nature of the project and the team working on it. At Q, we collaborate as much as we can with developers, BAs, etc. before presenting anything to the client.

STEP 5 – Usability Testing
Testing isn’t a joke. It requires a lot of attention to details and preparations for “no hard feelings dude” and “I don’t get it” sentences. It can be a heartbreaking experience because we tend to connect with our project decisions and ideas. But you need to know that testing will definitely make your product better and focus your attention on possible mistakes.
Mistakes are healthy, but it is better to find them in the design phase than the development phase. It is more cost-eicient and leaves you more space for thinking things over one more time. Your client, your bosses, and your developer colleagues will appreciate it.
First, you need to understand that the users’ feedback will depend on the fidelity of the prototype, on the presentation and on the tools you use. So be careful, and find the best solution for you.
The best way to test your products is Usability Testing – a method that gives you a structured approach to observe and assess your design of the Website or an App. With usability testing, you will find out what the user sees and does on a Website or an App. How does he manage it, how does he perceive the content, and did he hit the goal you set up. It ensures that the design you make is intuitive, easy to use, and works for users.
The best scenario would be if you can invite your interviewers, from the first phase, to test out your product. They are already introduced to the topic and its problems and have some emotional investment in it. It would be even better to find real or potential users that fit your target user description. But the key is to see if anyone other than you and your team members got the point, and for you to get the feedback from a set of new eyes.
Whatever you decide to do, you need to be prepared. User interview tips help out a lot, but here are a few more tricks for a live Usability Testing:
- You don’t want to waste someone’s time, so you need to “test plan” to avoid possible mistakes — test the schedule, place, and equipment.
- You need to set the goal, prepare instructions & scenarios for every task.
- Your Usability Test should include 3 persons: the Test user, the interviewer, and the Notetaker.
The interviewer should lead the test user through tasks, and he should encourage candidates to “think out loud.” Again it would be helpful if you can record the testing.

After the testing, collect all the insights, comments, and suggestions and write them down on post-it notes. Divide them into “Went Well” and “Could be improved” columns, and use the ainity mapping strategy where you seek patterns in behavior and insights.
At Q, we like to use Invision clickable prototypes, here and then we will use Maze or some new and fresh tool to remote test on a larger scale.
Conclusion
The main task of the UX designer is to:
- Understand the user
- Make conclusions
- Oer solutions to their needs
Well-structured steps will make you fulfill that goal and make this journey more accessible and more productive.
The conclusion that we at Q have come up with is that sometimes it is impossible to follow all the steps of this strategy in a real-life scenario.
Sometimes the client won’t be able to pay all the necessary steps, or the estimate will need to be cut short. You know all of it, don’t you?
But it’s not a perfect world we live in, so the goal is to do your best.
Try to implement as much knowledge and strategy steps as possible to every project, and try to corroborate every decision with a well-researched conclusion.
We have learned a few new tricks, we got to know each other on a deeper business level, and we ate a lot of pizza during it. So if you have some spare time and a willingness to learn, try to implement as many strategy steps as you can into your next project — I guarantee you will love it!
I hope you enjoyed this article! It was a real struggle to keep it “short”, so if you are interested to read more about a particular step of the strategy, and learn more about how we use it in practice, please let us know at design@q.agency!
Give Kudos by sharing the post!
ABOUT AUTHOR

Josipa Prsa
UI / UX Designer