Flutter Push Notification Actions: How to Implement Them on iOS and Android
September 3, 2026 — 12 min read

This blog post will help you implement push notification actions on iOS and Android to increase user engagement with your Flutter application using Firebase Messaging
You’ll learn how to configure actionable notifications on both platforms and handle user interactions within your Flutter application.
Table of content:
Before we get started, make sure you already know how to implement push notifications in Flutter as we are not going to cover the basics as there are plenty of tutorials for it readily available.
If that is not the the case, Firebase Messaging documentation is available here and the full example repository is available on GitHub.
You may already be familiar with notification actions in some form or another with examples including WhatsApp’s reply from notification, accepting an invitation from the notification button without opening the app or straight up deleting an email with a tap of a button.
The purpose of those actions is to increase user engagement, enhance user convenience using the application and provide contextual actions based on the push notification itself.
When talking in the context of Flutter we will reference non-destructive and reply actions. Material design guidelines do not have a separate visual to differentiate between destructive and non-destructive unlike iOS which can be made to show a destructive action in notification action
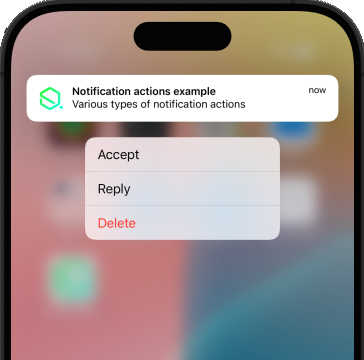
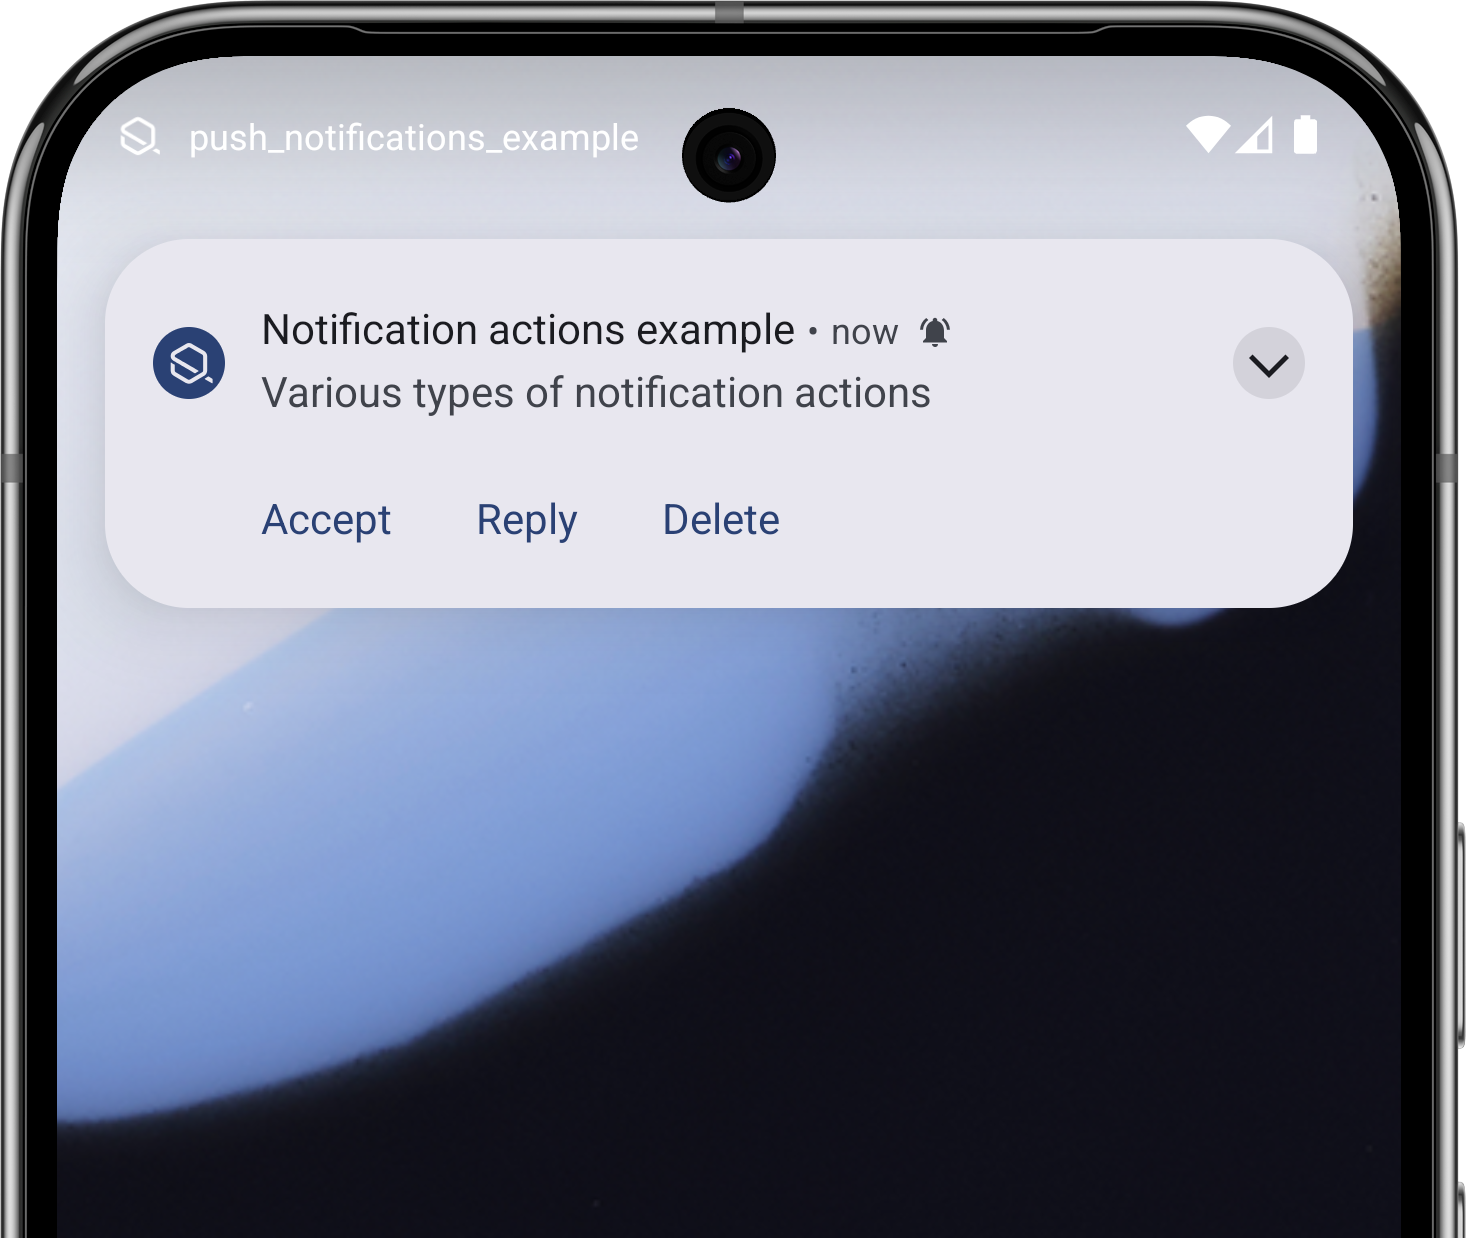
Images showing various examples of notification actions. With iOS showing destructive action in red while Android does not differentiate between them as it does not exist within Material Design guidelines. Left – iOS, Right – Android
There are 2 common types of actions as of January, 2026, they are as the title suggests:
Non-destructive action refers to an action that does not alter data in a “meaningful” way, can be easily reversible and generally safe to tap by accident.
An example would be accepting a friend request or accepting an invite to a meeting.
Reply is an action that allows for user interaction in the form of a textfield that allows custom input from users.
A good example is reply to a Whatsapp message from notification without opening the application.
(iOS only)
Destructive action refers to an action that is, as the name suggests, destructive.
That means deletion of data or actions that would impact the user in a more meaningful way. Delete or unsubscribe would be examples of such actions.
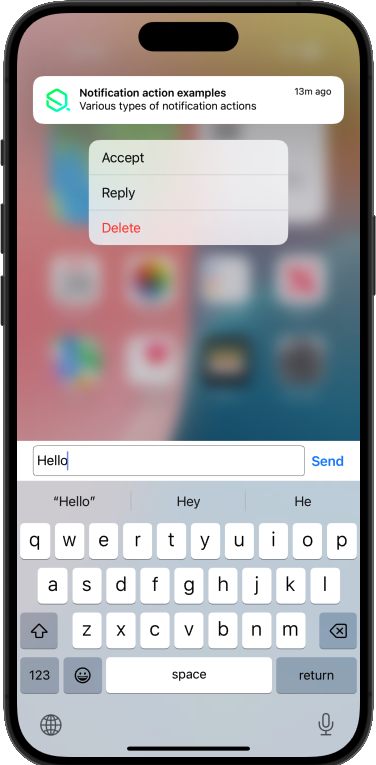
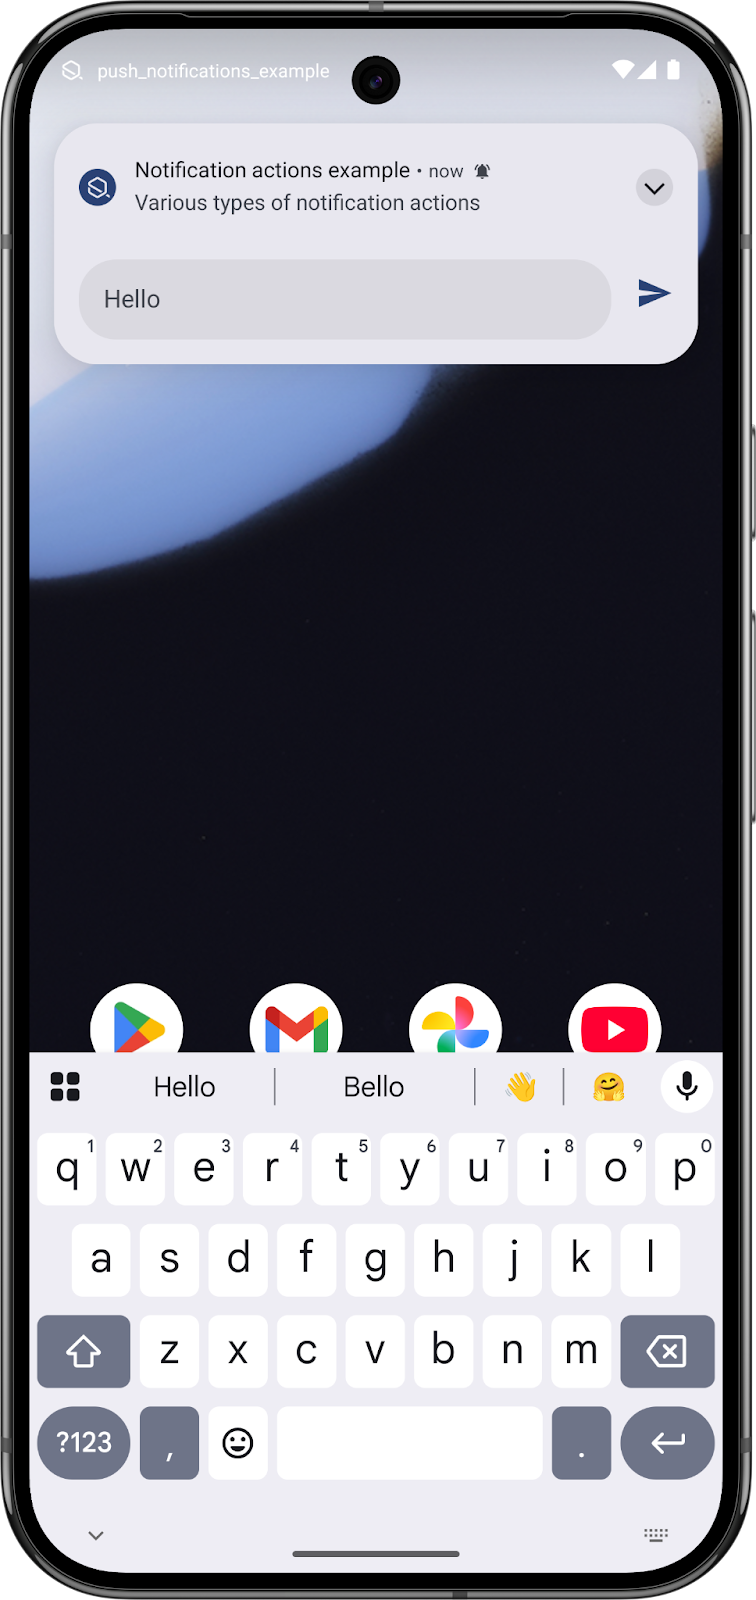
Image showing various examples of notification actions with user tapping reply and an open keyboard with textfield for custom input. Left – iOS, Right – Android
The entire Android setup can be skipped on the native side and be implemented through the flutter_local_notifications package as the background handler from Firebase Messaging works on android to create a local push notification and handle the rest from there which is easier to implement but we will show how to do it natively on Android and later on in Swift.
We will start by creating a notification channel called High importance channel with the id high_importance_channel.
For this blog we will focus on creating one custom channel that we will be using.
object NotificationChannels {
  const val CHANNEL_HIGH_IMPORTANCE_ID = "high_importance_channel"

  fun createHighImportanceNotificationChannel(context: Context) {
    if (Build.VERSION.SDK_INT < Build.VERSION_CODES.O) return

    val highImportanceChannel = NotificationChannel(
      CHANNEL_HIGH_IMPORTANCE_ID,
      "High importance channel",
      NotificationManager.IMPORTANCE_HIGH
    ).apply {
      description = "High importance notifications"
      enableLights(true)
      enableVibration(true)
      setShowBadge(true)
    }

    val nm = context.getSystemService(NotificationManager::class.java)
    nm.createNotificationChannel(highImportanceChannel)
  }
}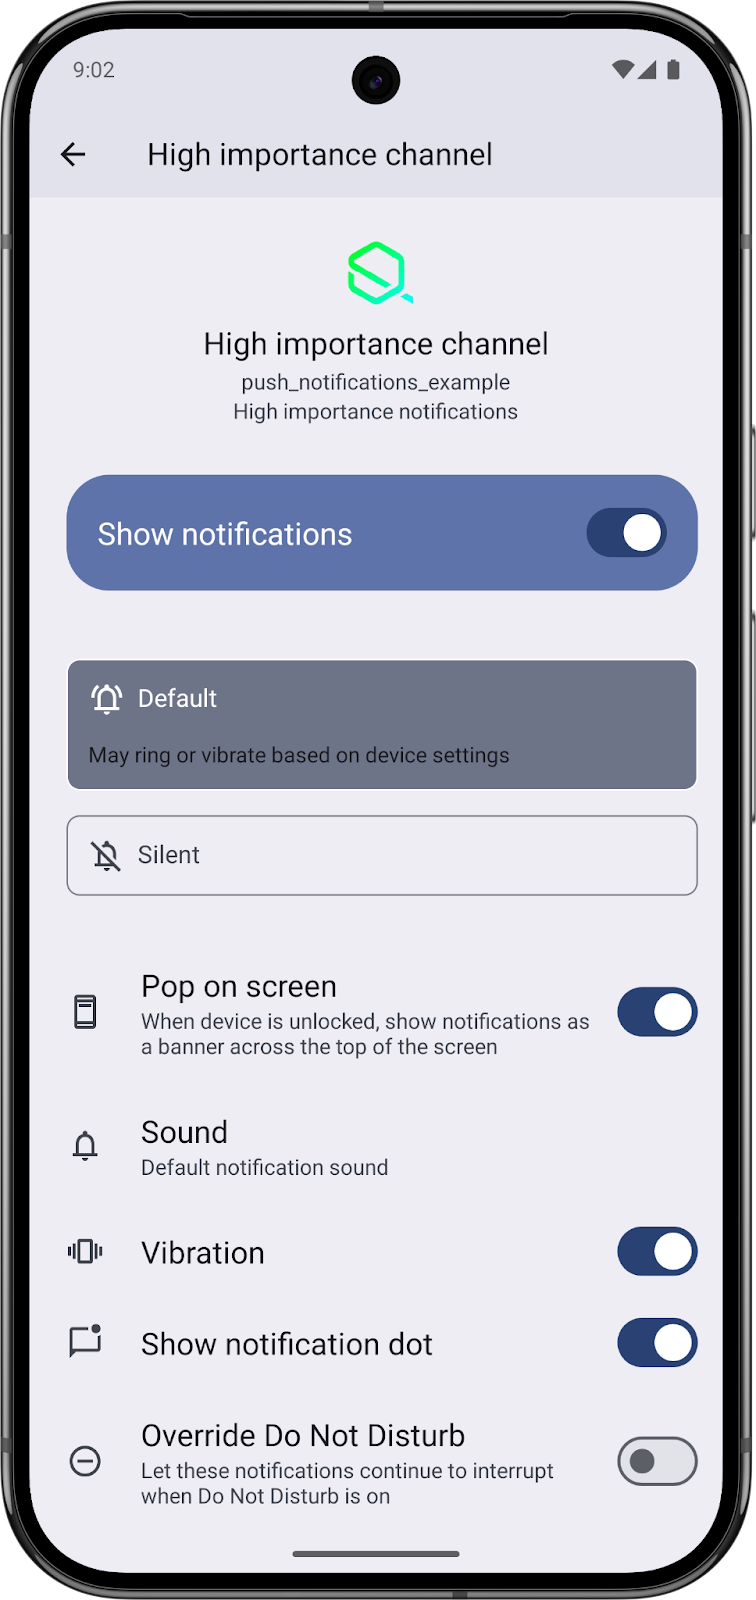
Image showing high importance channel in app settings, average amount of notifications together with permissions for the said channel and options to turn them on or off.
Next up, we have created the actual actions that we want to show and as mentioned before on Android we have 2 main types: non-destructive and reply actions but for the sake of consistency we will include the 3rd option to simulate our destructive action.
object NotificationActions {
    const val ACTION_ACCEPT = "ACTION_ACCEPT"
    const val ACTION_DECLINE = "ACTION_DECLINE"
    const val ACTION_REPLY = "ACTION_REPLY"
    ...
}
To avoid long code snippets, a full file can be found on GitHub. This points to the exact file where we define our actions on Android.
There will be quite some amount of new keywords and terms which won’t be covered in this blog as it’s extensive enough for beginners.
Each action is set up to open the MainActivity ( Flutter application ) where we will handle the action.
The basics won’t cover background handling of notification actions and instead will open the Flutter application where we handle the actions
After actions have been set up we need to create a service that will receive notifications and allow us to build a new notification injecting actions depending on what we need and in this case we will be sending data payload containing “category” key to build our notification.
class NotificationHelperService : FirebaseMessagingService() {
    override fun onMessageReceived(remoteMessage: RemoteMessage) {
        super.onMessageReceived(remoteMessage)
        buildNotification(remoteMessage)
    }
    ...
}
Create a NotificationHelperService extending FirebaseMessagingService and pass the RemoteMessage to our custom buildNotification function and add the service to your AndroidManifest to allow Android to use our custom service for firebase messaging intents:
<service
    android:name="agency.q.push_notifications_example.notification_helper.NotificationHelperService"
    android:exported="false">
    <intent-filter>
        <action android:name="com.google.firebase.MESSAGING_EVENT" />
    </intent-filter>
</service>
fun buildNotification(remoteMessage: RemoteMessage) {
val defaultChannel = "high_importance_channel"
val notificationIdToUse = newNotificationID()
val category = remoteMessage.data["category"]
when (category) {
"ACTIONS_CATEGORY" -> showNotificationActionCategory(remoteMessage, defaultChannel,
notificationIdToUse)
else -> showNotificationDefault(remoteMessage, defaultChannel, notificationIdToUse)
}
}buildNotification function takes RemoteMessage as a parameter and uses the “category” key from data payload to construct the notification to show:
fun showNotificationActionCategory(remoteMessage: RemoteMessage,channelId: String = "misc",notificationIdToUse: Int) {

   val notificationBuilder = NotificationCompat.Builder(this, channelId)

       .setSmallIcon(R.drawable.q_agency)

       .setContentTitle(remoteMessage.data["title"] ?: "No Title")

       .setContentText(remoteMessage.data["body"] ?: "No Body")

       .setContentIntent(contentPendingIntent(remoteMessage,...))

       .setPriority(NotificationCompat.PRIORITY_DEFAULT)

       .setAutoCancel(true)

       .addAction(NotificationActions.accept(this,notificationIdToUse))

       .addAction(NotificationActions.reply(this,notificationIdToUse))

       .addAction(NotificationActions.decline(this,notificationIdToUse))

   notify(notificationBuilder,notificationIdToUse)

}
showNotificationActionCategory that we use to build and show a notification if the category matches “ACTIONS_CATEGORY”.
Notification is built using the RemoteMessage by reading the data payload and setting the content title and text/body respectively.
Near the bottom actions are injected using .addAction and in this case we are adding all 3 created actions.
Clicking on the notification body results in opening the Flutter application without action and dismissing the notification.
Full file available on GitHub.
We are almost done setting up Android.
What remains is wiring everything up by processing the intents we created and sending them to Flutter via MethodChannels for processing.
Full file available on GitHub.
Flutter side will be shown later in the Flutter section after finishing up the iOS setup.
We will follow a similar approach on iOS as we did on Android.
Like Android, the native declaration of actions and categories can be set up using flutter_local_notifications package.
Unlike Android, iOS does not have notification channels.
Start by declaring the actions and the category identifiers that we will later use to set up the category.
static let actionAccept  = "ACTION_ACCEPT"
static let actionDecline = "ACTION_DECLINE"
static let actionReply   = "ACTION_REPLY"

static let actionsCategoryIdentifier = "ACTIONS_CATEGORY"
With the actions and category declared we can move onto creating the actions that will be used to create our “ACTIONS_CATEGORY”.
Each action is declared as UNNotificationAction and contains an identifier we declared earlier, title and options.
Options can be:
This blog covers the case of .foreground where we handle the rest inside our Flutter application.
let acceptAction = UNNotificationAction(
    identifier: actionAccept,
    title: "Accept",
    options: [.foreground]
)
let declineAction = UNNotificationAction(
    identifier: actionDecline,
    title: "Decline",
    options: [.destructive, .foreground]
)
let replyAction = UNTextInputNotificationAction(
    identifier: actionReply,
    title: "Reply",
    options: [.foreground],
    textInputButtonTitle: "Send",
    textInputPlaceholder: "Type your reply…"
)
The category itself is declared as UNNotificationCategory, for simplicity we will only cover identifiers and actions.
let actionsCategory = UNNotificationCategory(

   identifier: actionsCategoryIdentifier,

   actions: [acceptAction, replyAction, declineAction],

   intentIdentifiers: [], // ie. "INSendMessageIntent"

   options: [] // ie. .allowInCarPlay

)
For the entire setup refer to the GitHub file linked here — full file available on GitHub.
That is enough setup to get the actions on iOS.
What remains is intercepting the notification and saving the actionIdentifier as FirebaseMessaging does not support actions.
What we will do is intercept the notification, extract the data and save the actionIdentifier for later to read it inside our Flutter application.
In our AppDelegate.swift inside didFinishLaunchingWithOptions, we tell iOS to setup categories we added earlier and assign our NotificationHelperService as the notification delegate to intercept notifications.
let center = UNUserNotificationCenter.current()

center.setNotificationCategories(NotificationActions.notificationCategories())
center.delegate = NotificationHelperService.shared
To avoid copy-pasting the entire service, please refer to the GitHub.
The following function gets the notification as a UNNotificationResponse where we read the following information and what we are mostly interested in is actionIdentifier which is the same String we declared earlier, ie. “ACTION_ACCEPT.
If a user clicks on the notification body without triggering the action, the actionIdentifier will be “UNNotificationDefaultActionIdentifier”
func userNotificationCenter(
    _ center: UNUserNotificationCenter,
    didReceive response: UNNotificationResponse,
    withCompletionHandler completionHandler: @escaping () -> Void
) {
    let actionIdentifier = response.actionIdentifier
    ...
}
To avoid checking for that later in the Flutter we can just default the action to nil before saving it:
let action: String? = (actionIdentifier == UNNotificationDefaultActionIdentifier)
    ? nil
    : actionIdentifier
To cover the reply action, we need a separate check:
var replyText: String? = nil
if let textResponse = response as? UNTextInputNotificationResponse {
    replyText = textResponse.userText
}
After extracting all the data from response, save it to a Map called payload that will either get sent to our methodChannel if the application is opened, or save as a pendingOpenPayload waiting to be distributed after the Flutter application calls the “getInitialNotification” method:
let payload: [String: Any?] = [
    "action": action,
    "reply": replyText,
]
For further information on MethodChannels in Flutter, consult the official Flutter documentation on platform channels: https://docs.flutter.dev/platform-integration/platform-channel.
Now that we have native side setup, head over to the main.dart and prepare the MethodChannels implementation.
To handle the initial notification, invoke the earlier created channel and handle the result:
const MethodChannel _nativeNotificationChannel =
    MethodChannel('agency.q.push_notifications_example');
And now call _nativeNotificationChannel’s invoke method with the name you declared. To avoid checking for platform, it’s setup as “getInitialNotification” on both Android and iOS:
_nativeNotificationChannel.invokeMethod('getInitialNotification').then((result) {
  if (result != null) {
    final Map<String, dynamic>? payload =
        (result is Map) ? Map<String, dynamic>.from(result) : null;
    final display = _payload(payload);
    _handleNotificationAction(display);
  }
}).catchError((e) {
  // Handle error
});
This takes care of the initial notification, where the application is brought up from the background, either terminated or paused.
To capture the events in foreground, we will make use another method by setting up a MethodCallHandler:
_nativeNotificationChannel.setMethodCallHandler((call) async {
  if (call.method == 'onNotification') {
    final args = call.arguments;
    final Map<String, dynamic>? payload =
        (args is Map) ? Map<String, dynamic>.from(args) : null;
    final notification = _payload(payload);
    _handleNotificationAction(notification);
  }
});
Every time our native code invokes onNotification we get an event inside that we process inside _handleNotificationAction.
Full code can be found on GitHub.
To test the newly set up notifications. Head over to the Google OAuth Playground.
Under “Select & authorise APIs” go to the “Input your own scopes” and type in
“https://www.googleapis.com/auth/firebase.messaging” and click Authorise APIs.
After Authorisation with Google tap on the “Exchange authorisation code for tokens” to get a valid access token for 3600 seconds.
My preferred way of testing API’s is using Postman, available here.
To send a notification using Postman, use the earlier access token received from Google OAuth Playground as a bearer token.
Request URL corresponding to your Firebase project:
“https://fcm.googleapis.com/v1/projects/”your-project-id”/messages:send”
For the body of the request we need to have a distinction between how Android and iOS handle the notification using Firebase Messaging.
For this blog we can use a simple payload:
{
  "message": {
    "token": "<FCM_TOKEN>",
    "apns": {
      "payload": {
        "aps": {
          "alert": {
            "title": "Hello from postman"
          },
          "sound": "default",
          "category": "ACTIONS_CATEGORY"
        }
      }
    },
    "android": {
      "notification": {
        "channel_id": "high_importance_channel"
      },
      "data": {
        "category": "ACTIONS_CATEGORY",
        "title": "Hello from postman",
        "body": "Notification body"
      }
    }
  }
}
For Android it’s important to omit the “notification” as it will make the system create a notification of its own ignoring the category.
In both payloads, you can see our “ACTIONS_CATEGORY” field that we set up, and that allows us to connect the actions to notifications. Android takes a string from our custom data field and parses it as a category, then shows our notification by appending custom actions we set in our switch case, whereas iOS takes category parameters directly and shows the notification with system registered actions.
Flutter greatly simplifies development by allowing a single codebase to target multiple platforms. However, some challenges still require an understanding of the technologies and concepts specific to each platform in order to achieve the best results.
This blog post was written in August 2026. At the time of writing, firebase_messaging does not provide an out of the box solution for implementing notification actions in Flutter so we have to come up with a solution to the problem.
However, by leveraging native platform APIs and bridging them to Flutter through method channels, it is possible to implement notification actions and handle them within the Flutter application.

Zvonimir is a Mobile developer at Q Agency. Also known as Zvone, he is interested in mobile technologies such as Flutter, Android and iOS. When not working you'll find him spending time hiking and travelling.
Partner with us