In most cases, error reports from the Flutter terminal will give developers a headache as those reports usually contain unnecessary information instead of just getting to the core issue. This is where Sentry steps in.
Sentry is a platform that helps you better monitor the application. Introducing Sentry to your application will give you information about performance and errors which would not be received otherwise. You can integrate Sentry with Slack chat and receive reports in real-time to make it even easier to use.
Sentry Features
Some of the many Sentry features are:
- Automatic native crash error tracking using both android and iOS
- Sampling rate
- Oline storage of events
- Breadcrumbs are automatically captured by Flutter SDK, Native SDKs, and HTTP with the support of Dart SDK
Breadcrumbs
Sentry creates a trail of events in the code by using breadcrumbs to monitor what happened before the issue occurred. Events created in this way are usually more structured and clear. If the application unexpectedly crashes with the default behavior of the Flutter SDK, some events might be lost, but when using Sentry, the SDK will store the events on the device’s disk before the crash.
You can manually add breadcrumbs whenever something interesting happens. The code snippet down below shows how to add breadcrumbs manually.
body: ElevatedButton(

                child: const Text('Breadcrumb'),

                onPressed: () {

                  print('A print breadcrumb');

                  Sentry.captureMessage('A message with a print() Breadcrumb');

                },

              ),
Full detailed analytics of the breadcrumb trail of events that happened can be viewed on Sentry.io.
Breadcrumbs can be filtered by type, category, description, level, and time when the issue occurred.

The Flutter SDK already captures breadcrumbs automatically via the Native SDKs for Android and iOS.
For additional navigation breadcrumbs for Flutter apps, add the SentryNavigatorObserver to your MaterialApp, WidgetsApp, or CupertinoApp.
import 'package:flutter/material.dart';

import 'package:sentry_flutter/sentry_flutter.dart';

MaterialApp(

  navigatorObservers: [

    SentryNavigatorObserver(),

  ],

);
Getting Started
Adding Sentry package in pubspec.yaml file will install Sentry in your application:
dependencies:

  sentry_flutter: ^6.2.2
After including Sentry import package in main.dart file and start to configure it:
import 'package:sentry_flutter/sentry_flutter.dart';


const String _exampleDsn =

    'https://yourSentryDsnHere@sent...';


Future<void> main() async {

  await SentryFlutter.init(

    (options) {

      options.dsn = _exampleDsn;

      options.tracesSampleRate = 1.0;

    },

    appRunner: () => runApp(const MyApp()),

  );

}
With Sentry, you can manage the volume of the collected data. The higher value you choose, the more in-depth information you will receive, but too much information can again be confusing. Sentry documentation recommends starting at a lower value and increasing the rate as you learn about your traic patterns and volume.
After setting up, for testing purposes, try adding a code snippet that includes an intentional error to see if the errors are sent to Sentry:
body: ElevatedButton(

        child: const Text('async throws'),

        onPressed: () => asyncThrows(),

      ),
Tips for Catching Errors:
- Use a try/catch block
- Use a catchError block for Futures
- The SDK already runs your init callback on an error handler, such as using runZonedGuarded, which is captured automatically
- Flutter-specific errors, such as using FlutterError.onError, are captured automatically
- Isolate errors on the current Isolate, equivalent to a main/UI thread, such as using Isolate.current.addErrorListener, are captured automatically (only for non-Web Apps).
- For your own Isolates, add an ErrorListener and call Sentry.captureException
Capturing Errors
Sentry provides methods to filter data in your project. For example, inbound data filters allow you to determine which errors Sentry should ignore or accept.
Inbound filters include:
- Common browser extension error
- Events coming from localhost
- Known legacy browsers errors
- Known web crawlers
- By their error message
- From specific release versions of your code
- From certain IP addresses
It filters error events by using the beforeSend callback method and configuring, enabling, or disabling integrations. The beforeSend is called immediately before the event is sent to the server, so it’s the final place where you can edit its data. The beforeSend callback is passed to the event and a hint. Hint holds the original exceptions so the additional data can be extracted or grouping is aected.
import 'package:sentry/sentry.dart';


SentryEvent beforeSend(SentryEvent event, {dynamic hint}) {

  // Modify the event here:

  event = event.copyWith(serverName: null);

  return event;

}


Future<void> main() async {

  await Sentry.init((options) => options.beforeSend = beforeSend);

}
To get more about this error and how to resolve the recorded errors, log into Sentry.io and open up your project.
Clicking on the error’s title will open a page where you see all the details and afterward mark it as resolved when you are done with it.
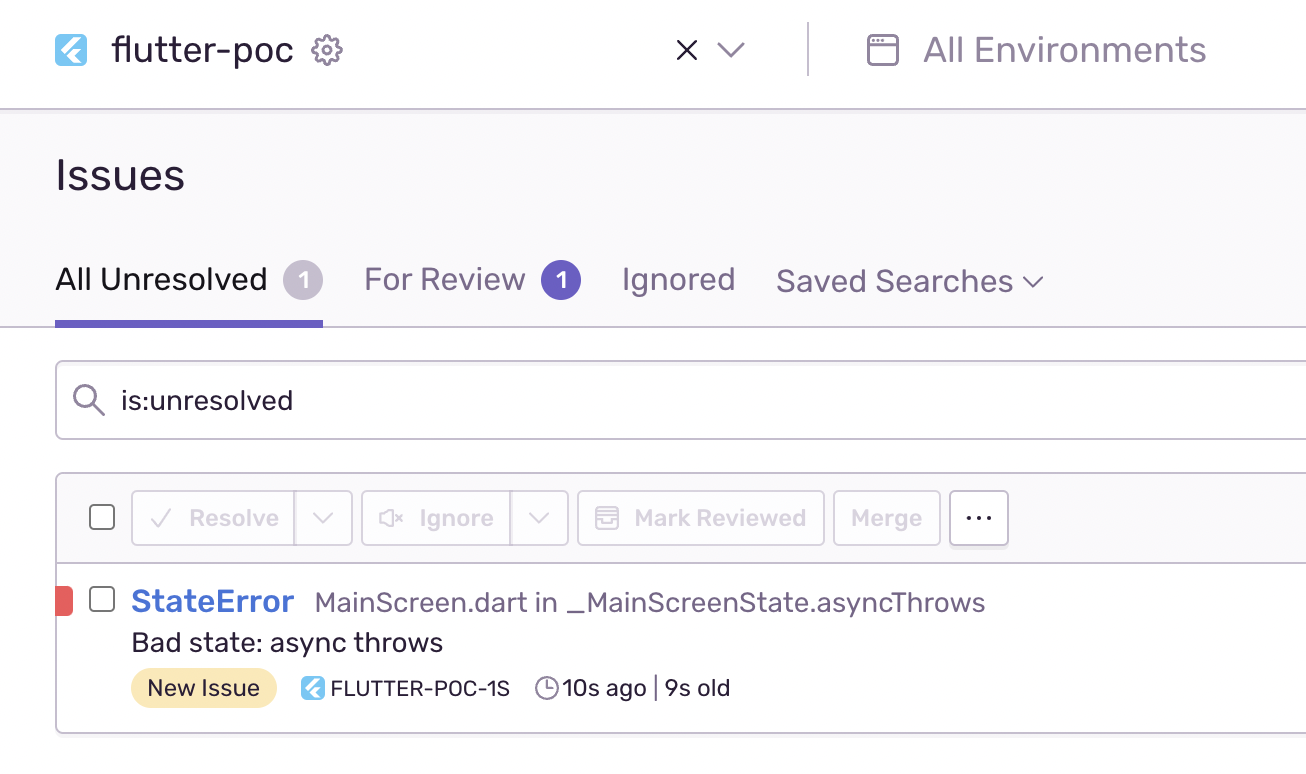
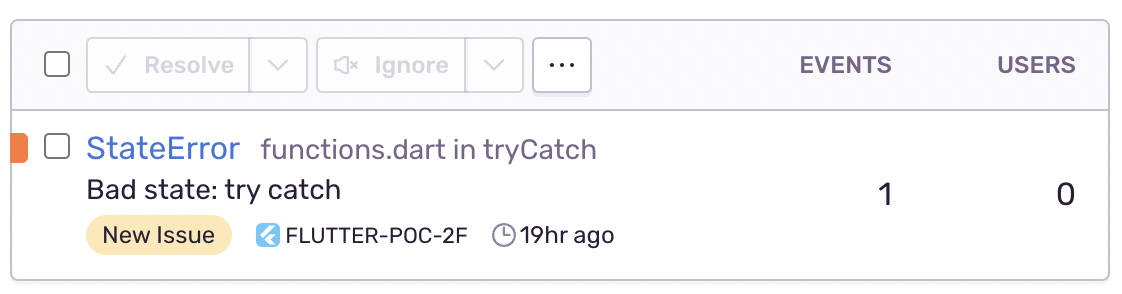
After you successfully connect the Flutter application with the Sentry, all errors will be captured and shown in the „Issues“ section shown below:
If you are using a multi-staged release process, you can also select a dierent default environment and set conditions that match the environment attribute to restrict alerts to only specific release stages.
Sentry with Slack integration
Integrating Sentry with Slack enables the possibility to define which reports will be received and who will receive them. It can be only one person or maybe the whole team.
Once you make this integration, you don’t necessarily need to be logged in on the Sentry platform to receive error reports in Slack chat. Instead, you will be able to track those errors in real-time inside Slack chat and take immediate actions by assigning, resolving, or ignoring the error link provided by the Sentry bot.
You have to have access to both Sentry and Slack to get started. Sentry owner or admin permissions are required for installation. Go to Settings in Sentry and choose Integrations, which will display a list of possible integrations.
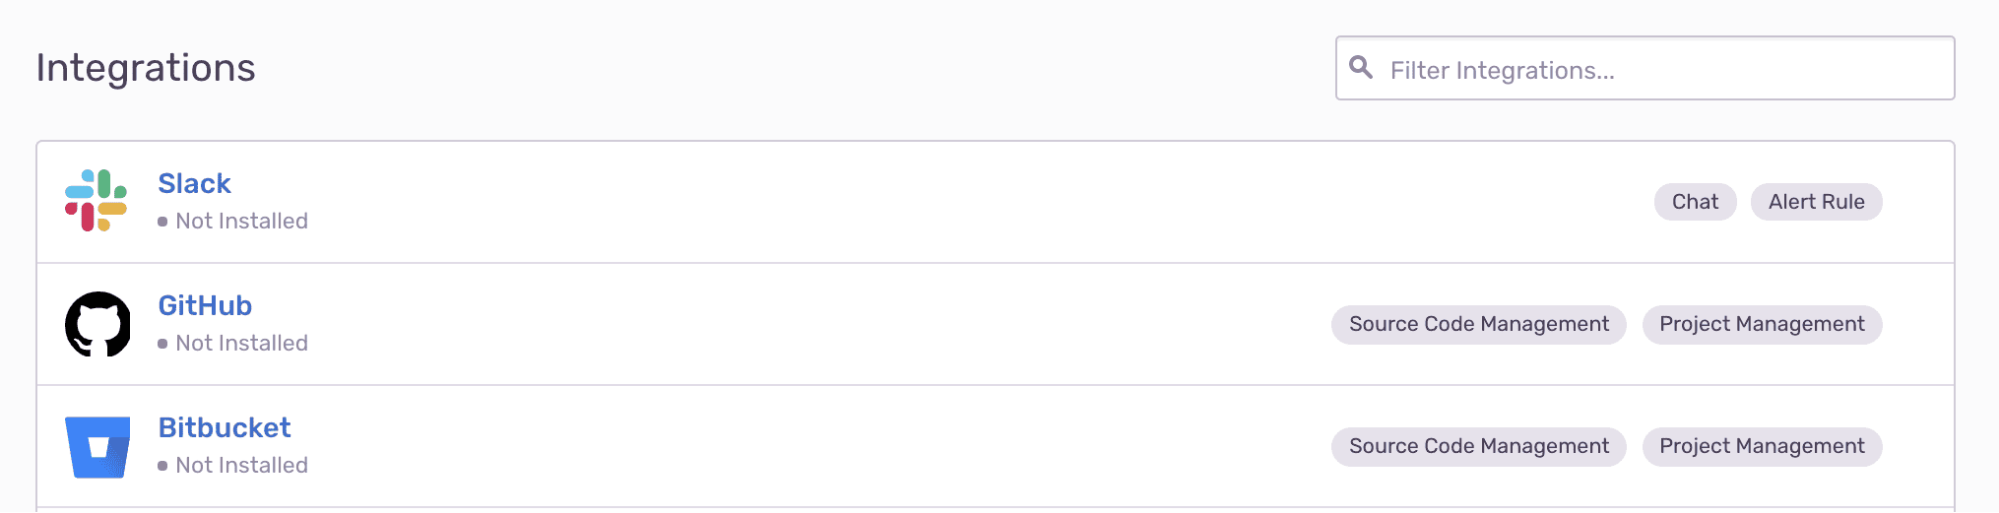
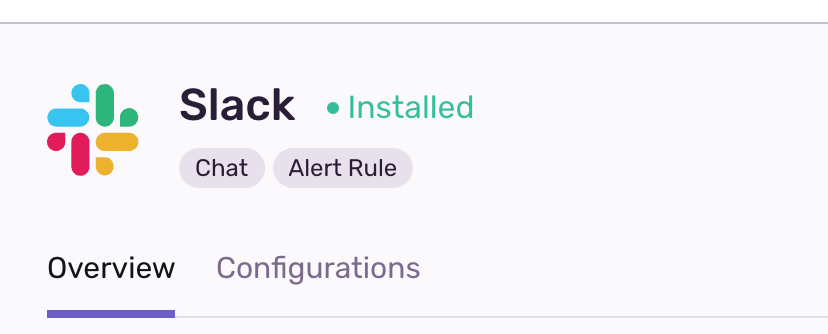
Choose Slack and Click the button Add Workspace. After successful installation, a green confirmation text Installed should appear, and integration is now available to all projects in your Sentry organization.
Alert Set-Up (Setry.io):
Once again, in Sentry, navigate to Settings and choose Alerts. From the drop drown menu choose a project to which you want to add alerts, and then click on Create Alert Rule:
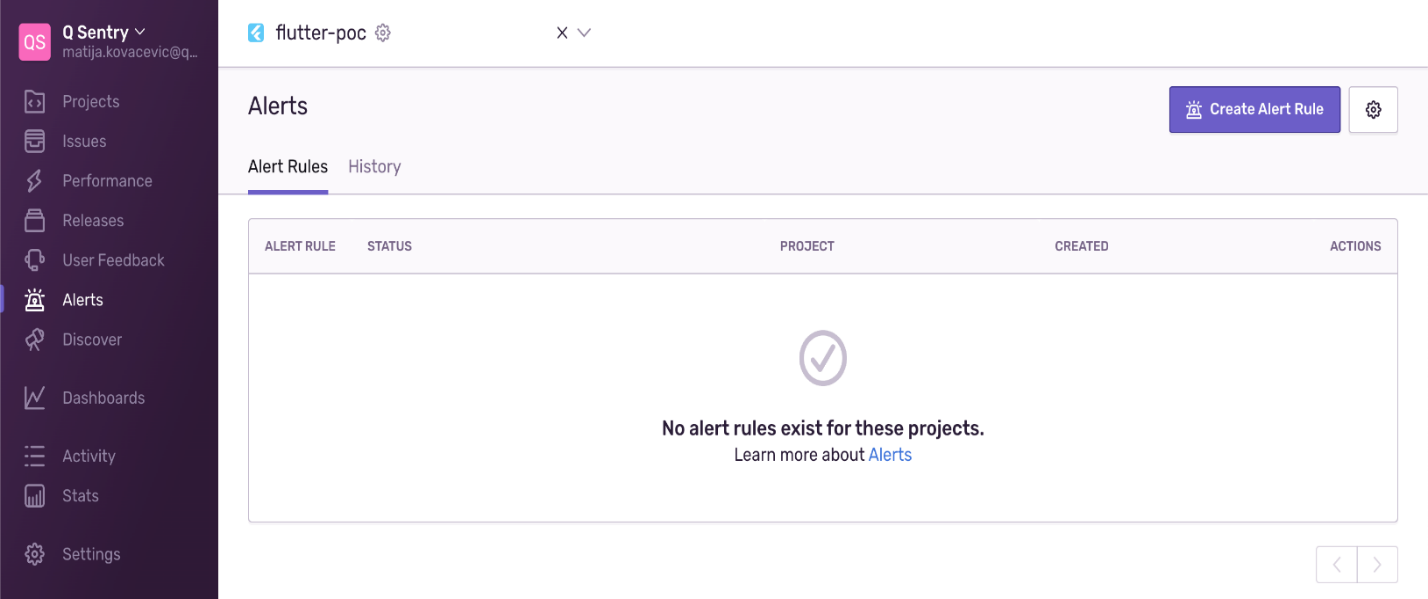
There are many options of alert types, but for simplicity of demonstration, I will use: Error > Issues. After selecting the alert of your choice, you can proceed by clicking the button Set Conditions.

Setting Conditions:
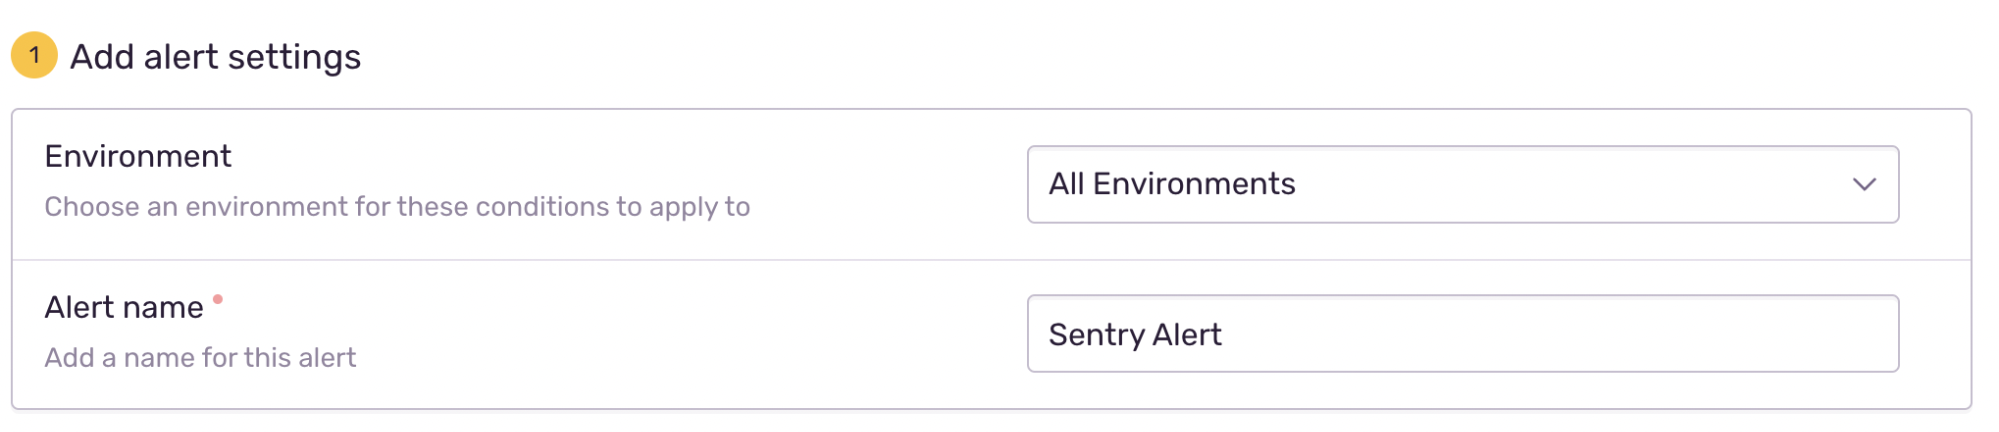
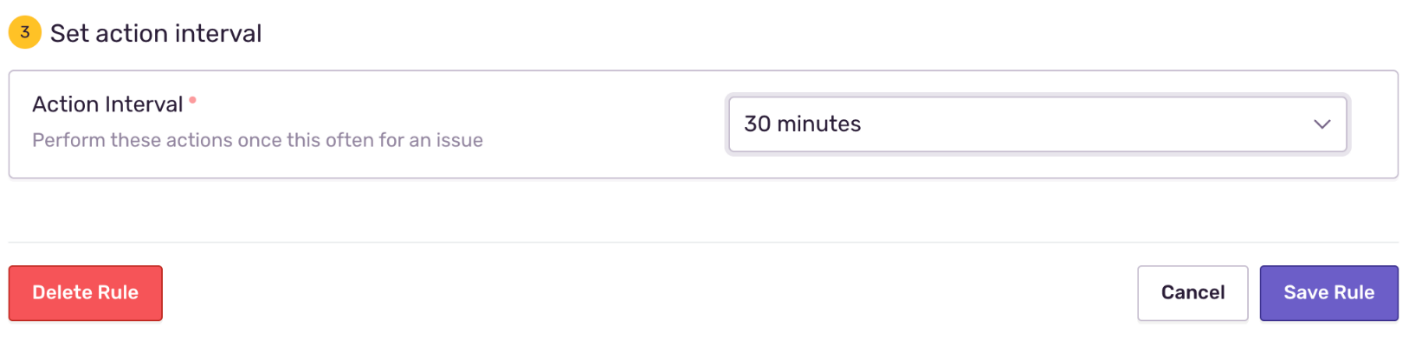
Conditions are here to help you customize how the alerts will be received. In my example „Issues“ I get to set 3 categories:
- Add alert settings
- Set conditions
- Set action interval
Add alert settings:
Choose where you want these conditions to apply. I will leave the default one All Environments and provide the alert name. Try keeping the alert name short and simple.
Set Conditions:
You get three conditions that need to be set to customize your alert.
When – you choose what happens when an event is captured. In this example, you can set “A new issue is created “whenever Sentry captures an event. Again, you can choose multiple triggers or just one.
If – you can set filters to customize further what conditions need to be met to perform actions assigned by then. I filtered what would happen if the issue was assigned to Mobile Team. This condition is optional to choose one, multiple, or none of the given filters.
Then – you pick who will receive and where they will receive an alert. This is where you connect alerts with Slack. In Slack Workspace, you must enter the correct Slack channel name. Otherwise, alert notifications won’t work. If you like to keep notifications under tags, go ahead and add a tag name.

The action interval, or rate limit, controls how often the alert rule can be triggered for a particular issue.
The available intervals are:
- Minutes: 5, 10, 30, 60
- Hours: 3, 12, 24
- Days: 7, 30
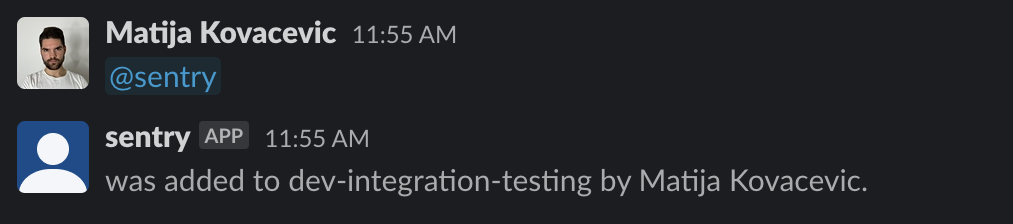
Alert Set-Up (Slack):
To add the Sentry bot to your Slack channel, navigate to chosen channel and type @sentry in chat. This command will invite the Sentry bot to the channel, which will provide future alert notifications.
Testing:
To test if the alert setup is completed successfully, you could create some intentional issues. Here is the example: StatError captured inside the mobile app and recorded on the sentry.io.
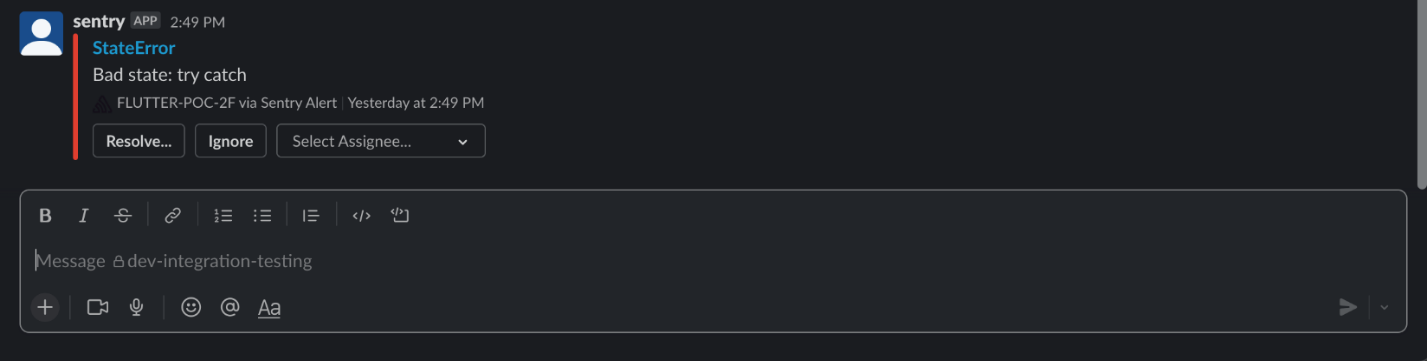
Same Issues appeared in the Slack channel, so you can use the Resolve, Ignore, or Assign buttons to update the issue in sentry.io directly from Slack chat.
Conclusion
Spending an extra couple of minutes to set up Sentry is worth it in the long run. It will shorten the time spent on tracking and resolving the errors. Great way to manage how much info you need on an error instead of going through pages of explanation.
Give Kudos by sharing the post!
ABOUT AUTHOR
Matija Kovacevic
Flutter developer